NerdBeach

Fix Your Macbook Time By Changing Time Servers

20151106_SmallClock

I routinely use a Macbook Air for a lot of my writing and programing (when I can) chores, and the small size along with respectable power and long runtime works well for me. However, recently it has stopped updating to the correct time. This change happened not long after the switch to El Capitan, but I could not find a direct cause and effect relationship. Also this was happening before the time shift this fall, so those mechanics are not the problem. Either way, this is what worked for me, and I thought I would share.

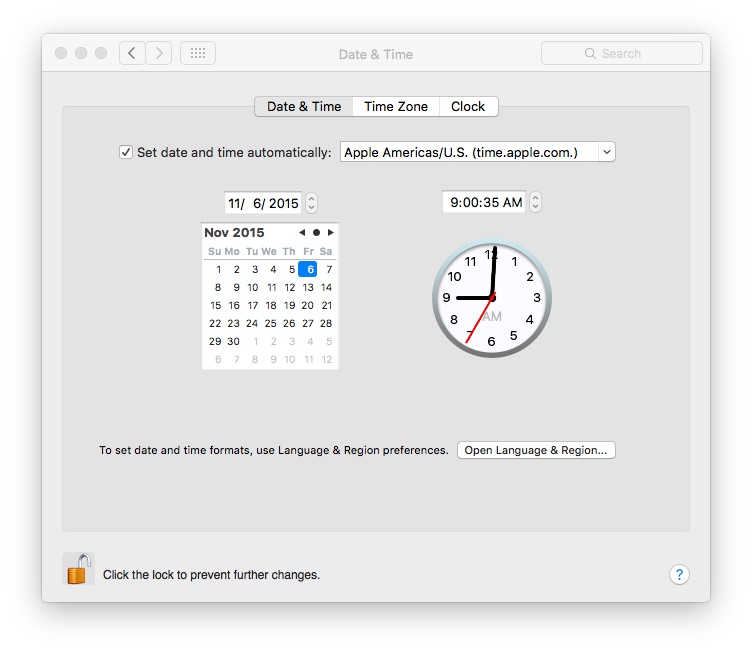
First of all, I do use a time server to automatically set the clock. I do this on all of my devices, simply because there are too many to be changing them twice a year. You can find these settings on a Mac by going to System Preferences \ Date & Time. This is what my settings looked like before I changed them:

20161106_PreviousTimeSettings

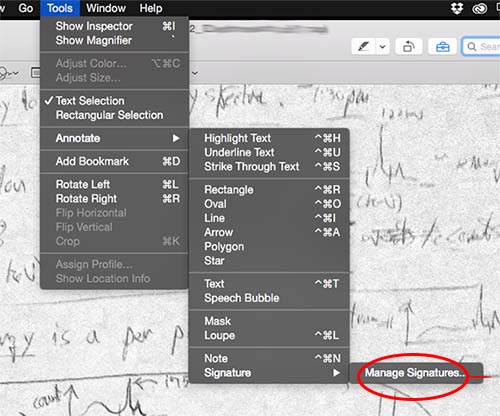
Now, I suspected that the culprit was that the time saver was not getting picked up properly on demand. The easiest solution for me was to switch to another time server.  But you want to make sure that you can properly reach the time server in question. To do this, make sure it pings okay. Open terminal on your Mac, and type “ping -C 5 “, followed by the new time server. In my case it was time.nist.gov. When you do this, it should look something like this:

20151106_ping

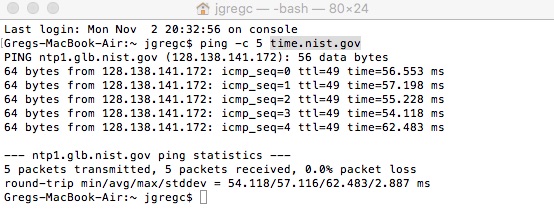
If you get a response back, note the time. Anything under 100 ms is great for this need, but higher is still usable. If that works, set your new time server in the time server settings. In my case, it now looks like this:

20151106_TimeSettings

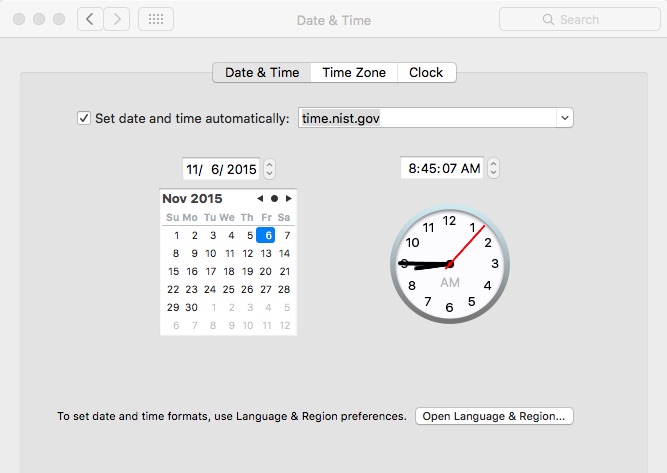
Note the time.nit.gov entry in the setting above. Also, you might want to set it to update automatically, which is the selection to the left of the server name. After that you should have it.

Just to recap, we made sure that the time server could be reached on your network, and then set it as the default time server. That is really all there is to it. But if your Mac continues to have time issues, it could be other problems that warrant a deeper investigation.

Using The Trackpad To Add A Signature

With the recent introduction of the 2015 refresh for the 13″ Macbook Pro lineup, a cool new feature was added – the force feedback trackpad. But wait – the existing trackpads are still capable of some handy tricks under Yosemite. Let’s look at one now – adding a signature using the Macbook (Pro and Air) trackpad.

20150328_MacTrackpadSign1

To start with, you will want to open preview and go to tools / annotate / signature and click on the “Manage Signatures” menu selection. Once you do that, a new window will open up, and this is where the magic happens.

20150328_MacTrackpadSign2

Now, all you need to do is to click the button and start signing with your finger (or favorite capacitance stylus) on the trackpad. Don’t worry if you don’t get it the first time – you can hit clear and try it until you get it acceptably legible for a written signature.

If your trackpad writing skills are just not up to snuff, you can go old school by writing your John Henry on a piece of white paper and importing it using the built in iSight camera. You do this by just selecting the camera tab at the top of the dialog.

Once added, you can easily insert your signature in preview under the tools / annotate menu. So, the next time they ask you to sign on the dotted line electronically, you are ready for it.

Use Airplay Mirroring With Almost Any Mac

When Mountain Lion launched, one of the “cool features” was the ability to mirror the output of the Mac in question to another screen through the use of AirPlay (no wires!). It was pretty sweet to throw those videos and presentations up on the HD screen, simple if you happened to have an Apple TV or XBMC handy.

However, the fun times are limited to users of 2011+ Macs. The reason is simple, and it is not an attempt on Apple’s part to force everyone to buy new hardware. You see, the later Macs have a hardware H.264 encoder, allowing the streaming to happen without sweating the machine. And Apple doesn’t like to see its latest gee-whiz features making its Macs sweat.

But if you do own a pre-mid 2011 Mac, there is a solution, The app AirParrot, which will set you back $10, allows you to do virtually the same thing as Airplay mirroring, but with practically any Mac. There is a timed demo, so you can try it before buying. Now, I have to warn you, without the hardware encoder things are going to run a bit warmer. But in testing the app with an older 2009 Macbook Pro, I found it to be quite manageable.

In fact, AirParrot gives you the option to use the HD screen as a secondary screen, just like an extended monitor. This is great, since it allows you to manage what is on the big screen. You can also select only certain apps to be on the other screen, making it really handy for presentations and other forms of entertainment.


AirPlay

AirPlay (previously called AirTunes when it was for audio only) is a proprietary protocol stack/suite developed by Apple Inc. that allows wireless streaming of audio, video, and photos, together with related metadata between devices. Originally only implemented in Apple’s software and devices, Apple has licensed the audio-streaming portion of the AirPlay protocol stack as a third-party software component technology to manufacturer partners for them to use in their products in order to be compatible with Apple’s iDevices.

source:wikipedia

Use Growl with Mountain Lion’s Notification Center

In the past, I have used Growl as the de facto standard for all of the screen notifications on a Mac. In fact, I have many scripts that feed Growl as part of of the process. However, when Notification Center was released as part of Mountain Lion, I found that its implementation was well done, and being part of the OS it had its advantages.

But just dropping Growl for Notification Center isn’t an option at the moment. I don’t want to lose all of the alerts I had set up, and there are many applications (such as Dropbox) that as of this writing does not yet support the new notifications. So the solution is simple – have Growl pass the alert over to Notification Center.  That solution – use the free app Hiss. The steps are simple:

  1. Download Hiss from the website
  2. Copy it to your Application folder.
  3. Turn off Growl if it is running. Hiss will replace it as a helper app.
  4. Start Hiss. NOTE: if this is the first time you run it with Mountain Lion’s Gatekeeper activated, you might have to right click on the app and open it.

When you first run Hiss, you will be presented with the preferences screen, as shown above. This will be a good time to set it up to start at login, as without it running you won’t be getting the messages. But while you are at it, disable Growl from starting automatically.

Once it is up and running, all of the Growl notifications start going directly to Notification Center. They will be listed under “Growl Helper App”, but all of the information is still present, including any “click to view” messages. An example message from DropBox is shown below.

Yes, it is a bit messy, having a 3rd party app relay messages from another 3rd party tool to the OS, but I don’t see a way around it for the short term. Growl 2.0 is supposed to offer support for Notification Center, allowing you to forgo the Hiss app and fine tuning your Growl notifications, but it is not available yet.

via lifehacker


Growl

Growl is a global notification system for the Mac OS X and Windows operating systems. Applications can use Growl to display small notifications about events which the user deems important, in a consistent manner. This allows users to fully control their notifications, application developers to spend little time creating notifications, and Growl developers to concentrate on the usability of notifications.

source:wikipedia